We’ll admit it: we live vicariously through interiors Instagram accounts. Following @KellyWearstler, @trendenser and @homewithAJ gives us daily dreamy interiors inspo. And while we make a habit of adorning Luxe Review Towers with furniture finds that we love, the shots we take of our own space don’t come out looking quite as Instaworthy as our favourite design accounts’ photos do. Turns out, interior photography is an art.
Thankfully you can instantly improve yours. So, what’s the secret?
We asked Victoria Erdelevskaya, interior photography specialist at designer furniture brand Heal’s, to offer up some advice when it comes to snapping photos of your home. Victoria’s tips will reveal how you can inject some magazine-worthy wow-factor into your own Instagram feed…
1. Use the (natural) light
Use natural light – ideally on a cloudy day / Credit: Heal’s
When photographing an interior space, natural light should always be the go-to option. Aim to take your shots when the light is at its peak.
Light from household light bulbs can cast a blue or yellow hue which can dampen the true colours and stop them from shining through your image, but if you colour balance your image you can avoid this altogether.
“Keep an eye on your room throughout the day. Every room faces the sun at a different time of the day, so make a note of when your room is bright, but not flooded with direct light,” says Victoria, “A bright but cloudy day is the holy grail for an interior photographer. The clouds act as a natural filter, providing a soft light throughout your space.
2. Get to know the tools on your phone
Up your exposure using your phone / Credit: Heal’s
You don’t need a professional DSLR to take magazine-worthy shots of your home. Modern smartphones come loaded with useful tools to help level-up your photography.
Victoria’s top tip? “My favourite trick for making photos look lighter and brighter is to slightly up the exposure setting. For a darker space, drop the exposure for a moody, dramatic feel.”
3. Don’t over-style the shot
Don’t be afraid to crumple bed linen for a lived-in look / Credit: Heal’s
For an unforced and authentic look, don’t overthink the styling. Instead, opt for the lived-in look.
“Instead of shooting a perfectly made bed, why not take a shot of the crumpled linens or for a sofa shot, sit down and use the space as you would normally,” suggests Victoria. That doesn’t mean you should go full Tracey Emin, though. “The texture this natural movement adds will be picked up in the shot, making the overall look feel genuine.
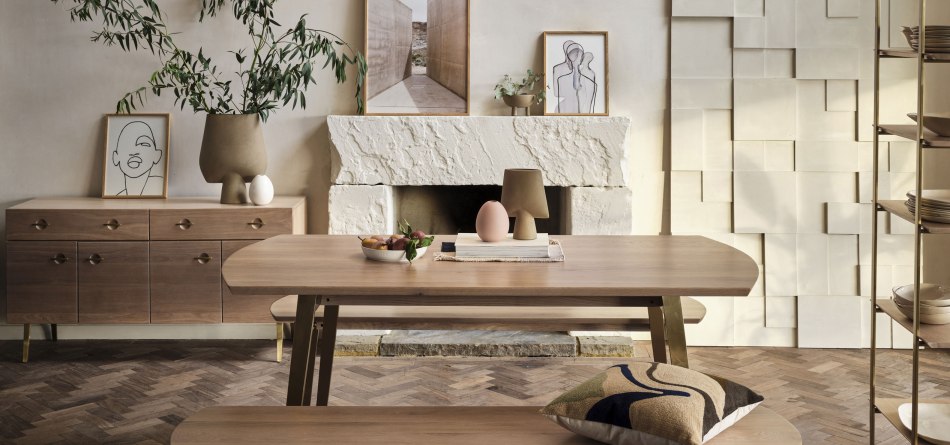
4. Allow for negative space…
Allow some negative space in your photos / Credit: Heal’s
Try to avoid cramming too many elements into one photo as this can make your image (and your Instagram grid) look too busy.
Give your images room to breathe by incorporating negative space. Shooting a whole room at once can sometimes look like a commercial or estate agent photoshoot. Try and focus on one one element, such as a perfectly styled fireplace, or a sideboard.
“If you’re taking a picture of a shelf or any other styled, flat surface try pulling all of your items closer to the front edge, rather than having them pushed back against the wall, as this will draw the eye into the frame,” says Victoria.
5. …and plenty of depth
Objects closer to the camera will add depth / Credit: Heal’s
Use layers of accessories to add depth and texture to your picture. Try adding a throw to the end of the bed, a plant on the floor close to the camera, or a cushion on a small stool to give the eye plenty to take in.
6. Shoot from the Hip. Literally.
Lower the camera for a dramatic look / Credit: Heal’s
Test out some different angles when shooting your picture. The lower the camera, the more dramatic the image will appear, which can totally change the end result.
“The angle you select for your shot will vary depending on the room you are shooting,” says Victoria, “For a kitchen, you don’t want to be low enough so that you capture the bottom of your kitchen cabinets, but you do want to give the feeling of height. Play around with holding the camera lower to find an angle that works for you.”
“Take cues from the height of your furniture,” adds the photographer, “In a living room, the furniture is going to be lower than in the kitchen, so dropping your camera lower than eye level will make the sofa seem more plush. If the focal point of your image is lower down, then mimic this with your camera.”
7. Make your images a slice of life
Add life to your photos / Credit: Heal’s
They say never work with children or animals, but the opposite is true when it comes to your Instagram; don’t be afraid to include your kids or your pets for a more energetic and spirited shot.
“Instead of making children or pets pose for a photo, encourage them to play in the space you want to snap,” says Victoria, “People want to feel like they have stepped through the screen and into your home, so letting them be natural will only add to this.”
Victoria is an interior photographer for Heals. Browse more of her photography – and of course, beautiful designer furniture – at heals.com

We’ll admit it: we live vicariously through interiors Instagram accounts. Following @KellyWearstler, @trendenser and @homewithAJ gives us daily dreamy interiors inspo. And while we make a habit of adorning Luxe Review Towers with furniture finds that we love, the shots we take of our own space don’t come out looking quite as Instaworthy as our favourite design accounts’ photos do. Turns out, interior photography is an art.
Thankfully you can instantly improve yours. So, what’s the secret?
We asked Victoria Erdelevskaya, interior photography specialist at designer furniture brand Heal’s, to offer up some advice when it comes to snapping photos of your home. Victoria’s tips will reveal how you can inject some magazine-worthy wow-factor into your own Instagram feed…
1. Use the (natural) light
When photographing an interior space, natural light should always be the go-to option. Aim to take your shots when the light is at its peak.
Light from household light bulbs can cast a blue or yellow hue which can dampen the true colours and stop them from shining through your image, but if you colour balance your image you can avoid this altogether.
“Keep an eye on your room throughout the day. Every room faces the sun at a different time of the day, so make a note of when your room is bright, but not flooded with direct light,” says Victoria, “A bright but cloudy day is the holy grail for an interior photographer. The clouds act as a natural filter, providing a soft light throughout your space.
2. Get to know the tools on your phone
You don’t need a professional DSLR to take magazine-worthy shots of your home. Modern smartphones come loaded with useful tools to help level-up your photography.
Victoria’s top tip? “My favourite trick for making photos look lighter and brighter is to slightly up the exposure setting. For a darker space, drop the exposure for a moody, dramatic feel.”
3. Don’t over-style the shot
For an unforced and authentic look, don’t overthink the styling. Instead, opt for the lived-in look.
“Instead of shooting a perfectly made bed, why not take a shot of the crumpled linens or for a sofa shot, sit down and use the space as you would normally,” suggests Victoria. That doesn’t mean you should go full Tracey Emin, though. “The texture this natural movement adds will be picked up in the shot, making the overall look feel genuine.
4. Allow for negative space…
Try to avoid cramming too many elements into one photo as this can make your image (and your Instagram grid) look too busy.
Give your images room to breathe by incorporating negative space. Shooting a whole room at once can sometimes look like a commercial or estate agent photoshoot. Try and focus on one one element, such as a perfectly styled fireplace, or a sideboard.
“If you’re taking a picture of a shelf or any other styled, flat surface try pulling all of your items closer to the front edge, rather than having them pushed back against the wall, as this will draw the eye into the frame,” says Victoria.
5. …and plenty of depth
Use layers of accessories to add depth and texture to your picture. Try adding a throw to the end of the bed, a plant on the floor close to the camera, or a cushion on a small stool to give the eye plenty to take in.
6. Shoot from the Hip. Literally.
Test out some different angles when shooting your picture. The lower the camera, the more dramatic the image will appear, which can totally change the end result.
“The angle you select for your shot will vary depending on the room you are shooting,” says Victoria, “For a kitchen, you don’t want to be low enough so that you capture the bottom of your kitchen cabinets, but you do want to give the feeling of height. Play around with holding the camera lower to find an angle that works for you.”
“Take cues from the height of your furniture,” adds the photographer, “In a living room, the furniture is going to be lower than in the kitchen, so dropping your camera lower than eye level will make the sofa seem more plush. If the focal point of your image is lower down, then mimic this with your camera.”
7. Make your images a slice of life
They say never work with children or animals, but the opposite is true when it comes to your Instagram; don’t be afraid to include your kids or your pets for a more energetic and spirited shot.
“Instead of making children or pets pose for a photo, encourage them to play in the space you want to snap,” says Victoria, “People want to feel like they have stepped through the screen and into your home, so letting them be natural will only add to this.”
Victoria is an interior photographer for Heals. Browse more of her photography – and of course, beautiful designer furniture – at heals.com
Share this: